
The mesmerizing aroma of freshly baked bread is something you cannot forget and want to fill your home with again and again. Once you taste this homemade wheat bread that you can easily make at home with little effort, you will never want to buy store bread at the store again. Let us show you how easy and tasty it is.

Making homemade wheat bread is a fun and rewarding experience that can offer numerous benefits. It is a healthier alternative to store-bought bread and allows you to customize the ingredients. You can adjust the amount of a sugar-free sweetener (or replace it with refined sugar, if you prefer) and salt in the recipe or replace some flour with whole-grain flour. You're free to experiment since you are the chef!
Homemade wheat bread has several benefits-it's high in fiber, vitamins, and minerals and contains no artificial preservatives or additives. It remains fresh for several days, and additional loaves can be stored in the freezer. When defrosted, they'll taste just like freshly baked. I must warn you, though-the smell of this bread is so inviting and delicious that you'll hardly ever have anything left to freeze, especially if you have kids at home.
There are endless possibilities for using and enjoying homemade wheat bread. Toast it for sugar-free breakfast sandwiches, or serve it with warm tomato soup or a cozy harvest soup.
We use this bread dough for our homemade XL and mini burgers. These buns are so yummy! With this amount of dough, you can make various combinations of large (XL) and mini burgers. We usually make 2 XL buns and 6 mini buns (for burgers like these), but you can also make 3 XL burgers or a large pile of mini burgers (around 18 in total).
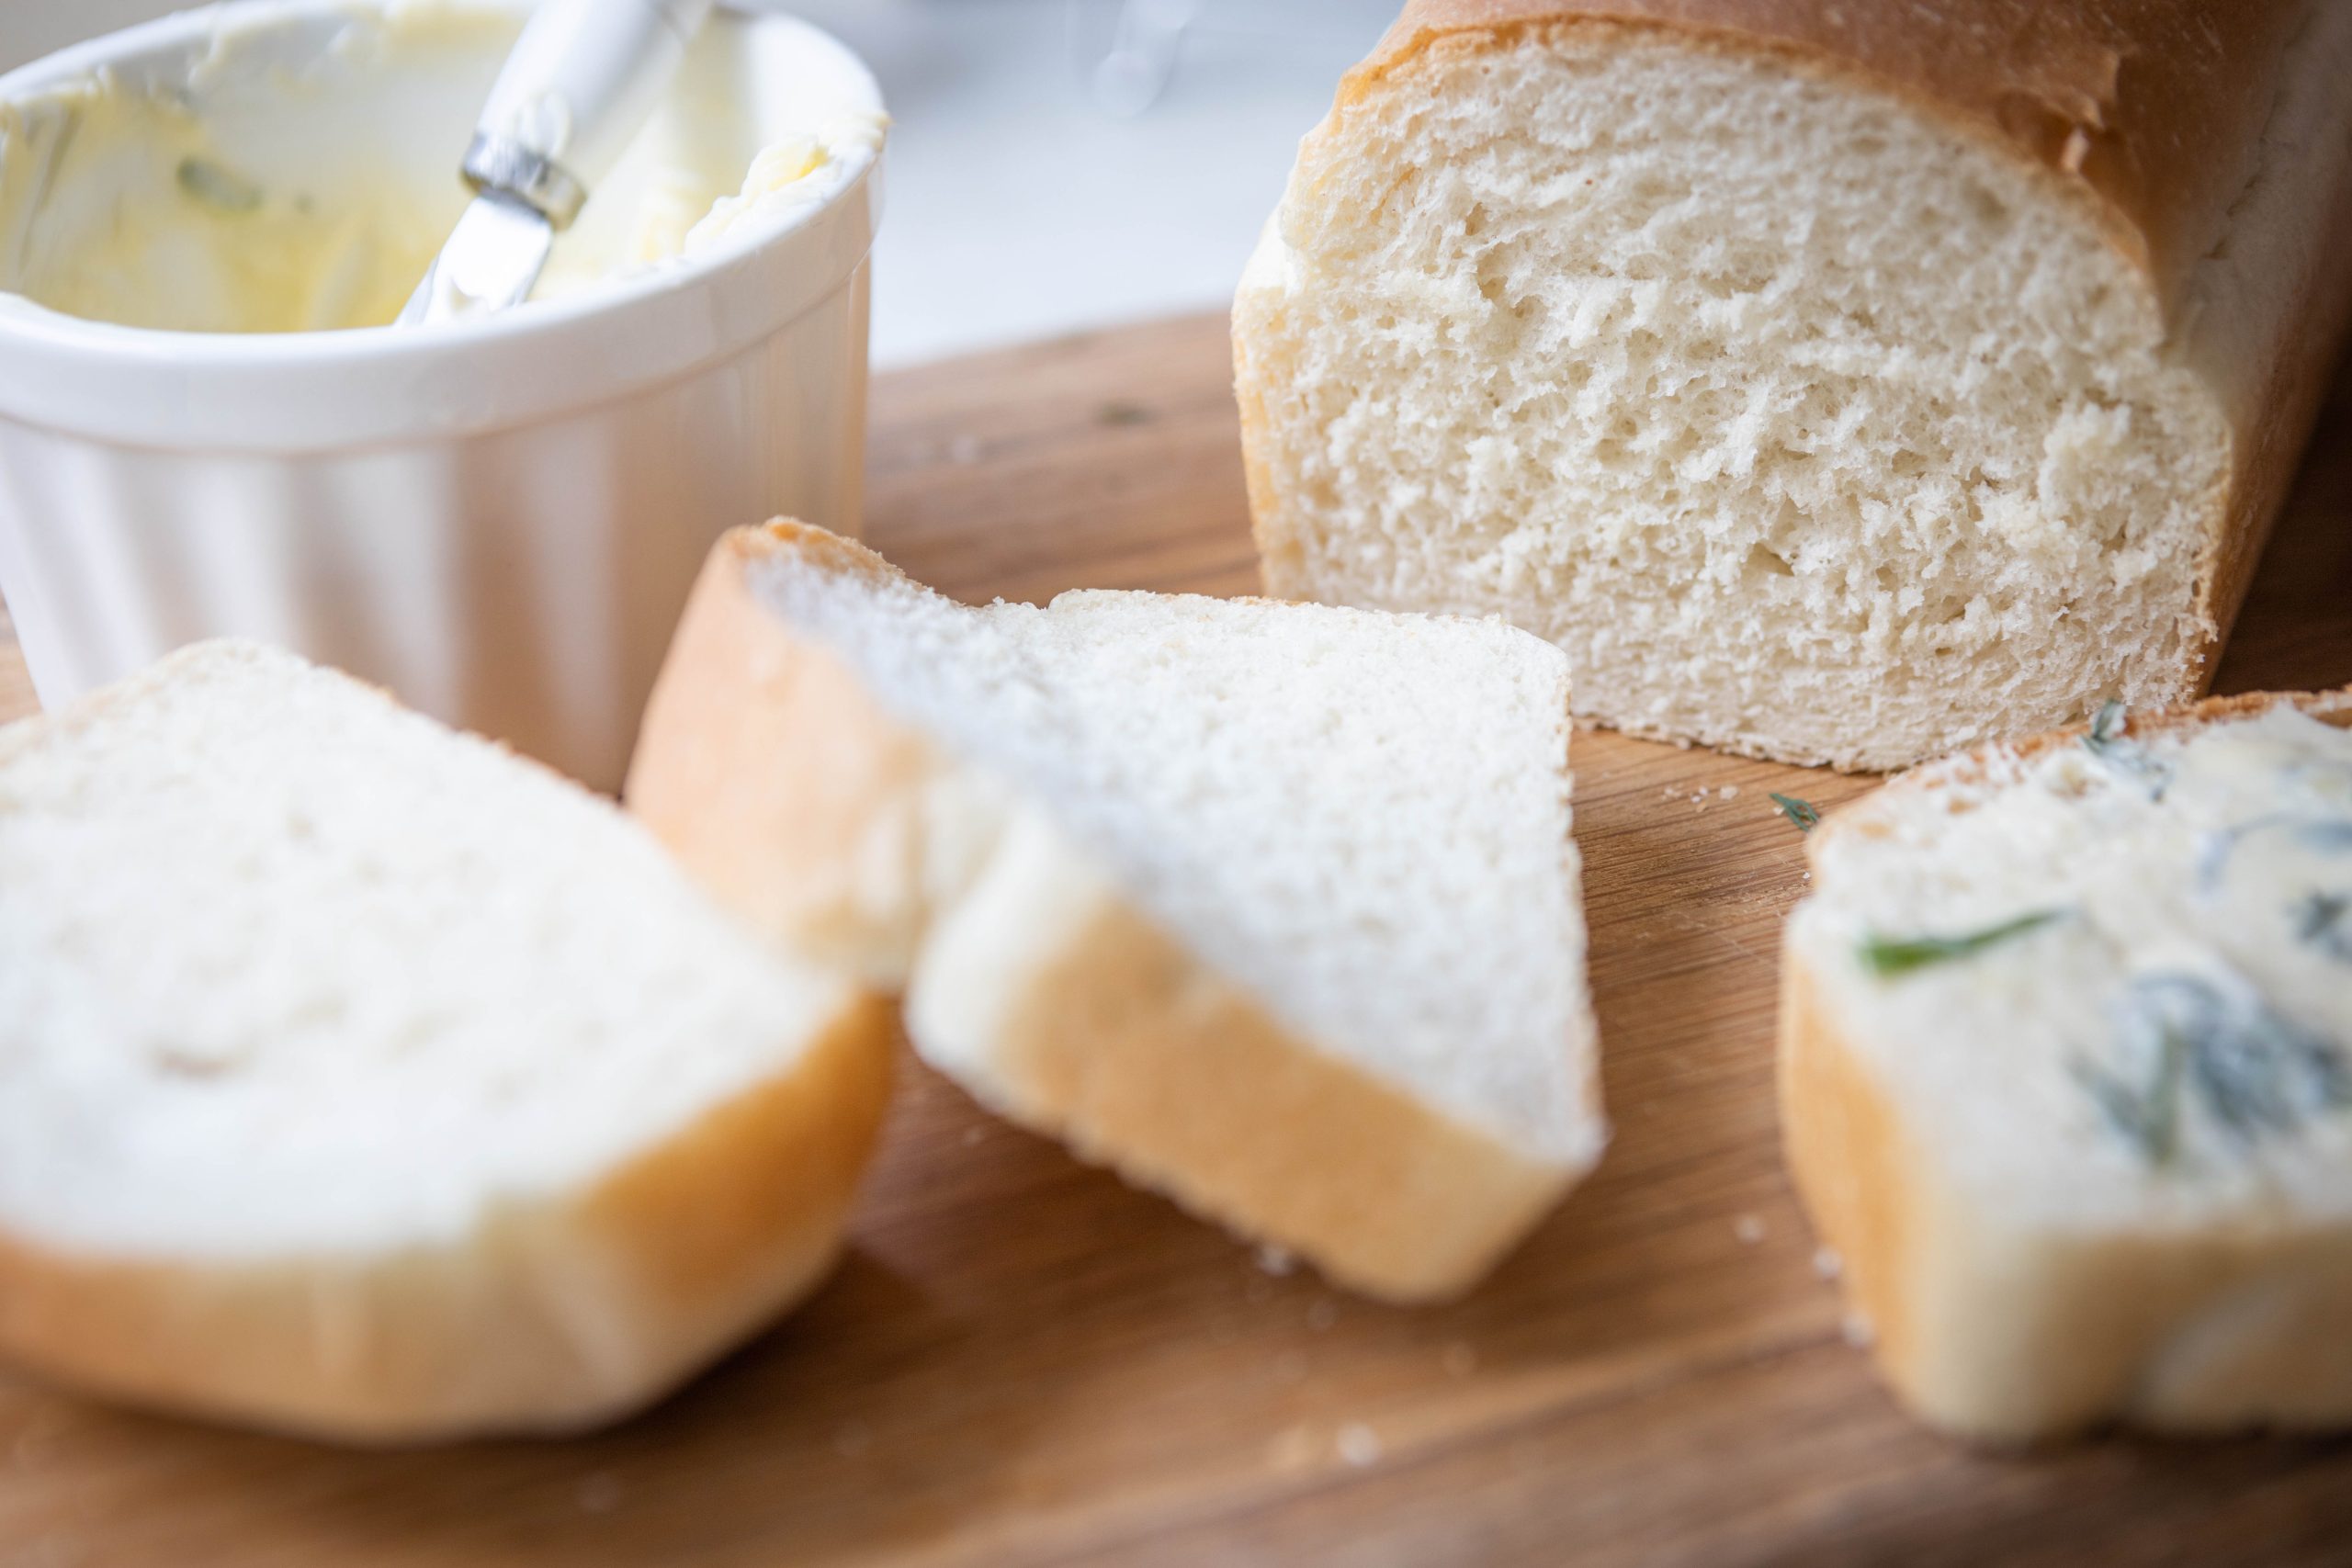
To make it even harder to resist, serve the bread with some salty garlic butter (mixing soft butter, a pinch of salt, cloves of minced garlic, and chopped fresh dill). This is a terrific combo that can switch your breaks off, be warned!
Now, enough talking; let's get right into it so that you can taste it for yourself!

Why You'll Love This Recipe
- You won't need to mess with a sourdough starter, meaning no extra knowledge or skills are needed, and baking the bread takes less time!
- This easy sandwich bread recipe will ensure your family can enjoy healthy homemade bread anytime. It does not contain flavor enhancers, preservatives, or other nasty things you don't want to consume yourself or give to your dearest ones.
- It's 100% free of added sugar (although this recipe is easily adaptable to use refined sugar instead of a sugar-free alternative).
- The same dough can be used for white sandwich bread or burger buns! (Well, technically, you can even use it for cinnamon rolls, but we have a better option in this recipe)
- The recipe only calls for basic ingredients that can be bought at any grocery store and might already be available in your pantry!
Ingredients
Sesame seeds (optional): Sesame seeds add that extra flavor and charm to the bread, so we highly encourage you to add them.
All-purpose wheat flour: This recipe calls for regular all-purpose wheat flour. Once you've mastered the recipe, you can experiment with replacing a small part of the flour with whole grain wheat flour if you're more into whole-grain bread. But we suggest starting with the original recipe the first time to have a solid base and know exactly what the process involves and what result you can achieve.
Salt: fine sea salt or kosher salt.
Sugar-free sweetener: It was believed that you cannot cut too much sugar because the bread needs to rise. However, it's not always the truth. Once we started moving away from sugar in our diet and experimenting, we found that the bread's taste or texture wasn't compromised in any way if sugar and salt were reduced. So, we gradually reduced the amount of sugar in this recipe, replacing it with an alternative sweetener (monk fruit or erythritol-based), and finally could skip added sugar altogether.
We're monitoring sugar intake very closely, always looking for ways to avoid adding refined sugar to our family meals. Therefore, it is no surprise that we have also managed to bake this same bread without sugar, using solely honey or a sugar-free alternative. However, it's very important to choose the right type of yeast and ensure it's of the highest quality and fresh. When using honey, note that the rise time tends to increase, and it might also impact the texture slightly, but not much. From our experience, honey-based bread tends to be somewhat crumbly.
Instant yeast (rapid rise yeast): Basically, you can use any type of yeast which doesn't require sugar to activate. Our regular choice is dry instant yeast. It acts fast and requires no prior activation in warm water. (Note: Pay close attention to any changes in dough rise time over time after opening the yeast package, and always ensure yeast is kept in an airtight container. If you notice that yeast is becoming less efficient and your dough doesn't rise as well as before, replace the yeast with a fresh package.) For this recipe, it's also OK to use dry active yeast, which must be dissolved in water to activate it. See the FAQ section for tips when using fresh yeast (instead of dry yeast).
Olive oil: Oil adds to the bread's soft texture, and you'll only need one tablespoon.
Butter: You'll need regular unsalted butter to grease the bread pans.
Directions
The Dough:
1. If using dry active yeast, dissolve it in a bowl with warm (not hot!) water and set aside for 5-10 minutes. If the yeast is of high quality, it will "inflate" slightly during this time. Skip this step when using instant yeast.
2. Add salt, sweetener, and olive oil to the bowl of a stand mixer. (If using instant yeast, simply add yeast and warm water to the same bowl.)
3. Measure the required amount of flour and grab a sieve-you'll need it soon.
4. Add the yeast to the mixing bowl and stir well using a spoon to combine all the ingredients.
5. Sieve flour into the mixing bowl and install the dough hook attachment.
6. Start mixing at a minimum speed for 5 minutes, then increase the speed by 1 step and mix for another 5 minutes. After the first 5 minutes, the dough should already be mixed well enough to jump off the sides of the bowl. If it sticks to the walls, add slightly more flour.
1st Rise:
7. Transfer the dough to a large greased bowl (alternatively, lift the dough ball, grease the bowl of your stand mixer, and return the dough to the same bowl-fewer dirty dishes equals more time for what you love to do); cover it with a lid or a towel, and transfer it to a slightly preheated oven or another warm place for the first rise. I usually preheat the oven to about 85°F (30°C). At this temperature, the dough takes about an hour to rise.
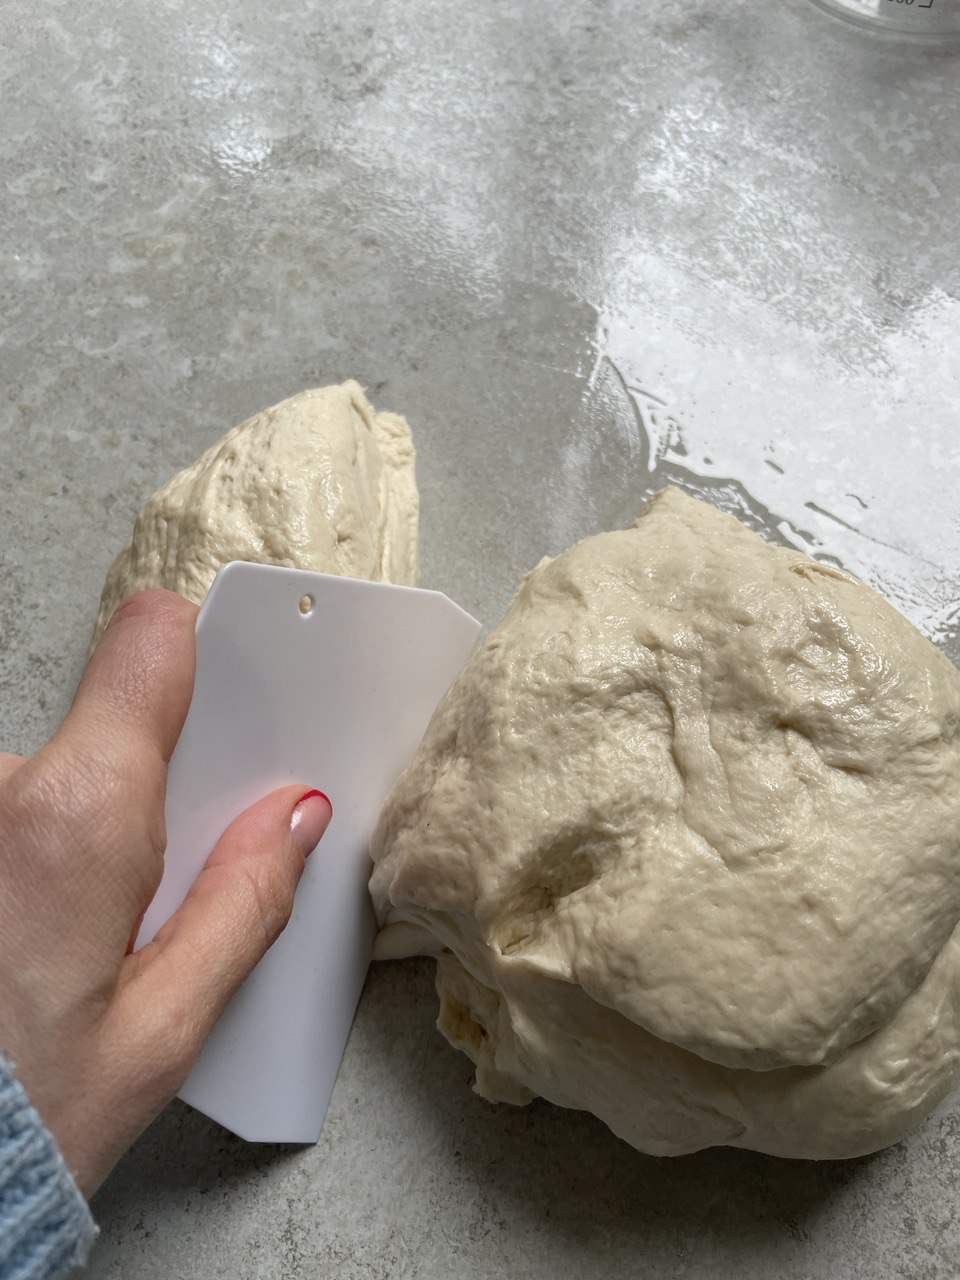
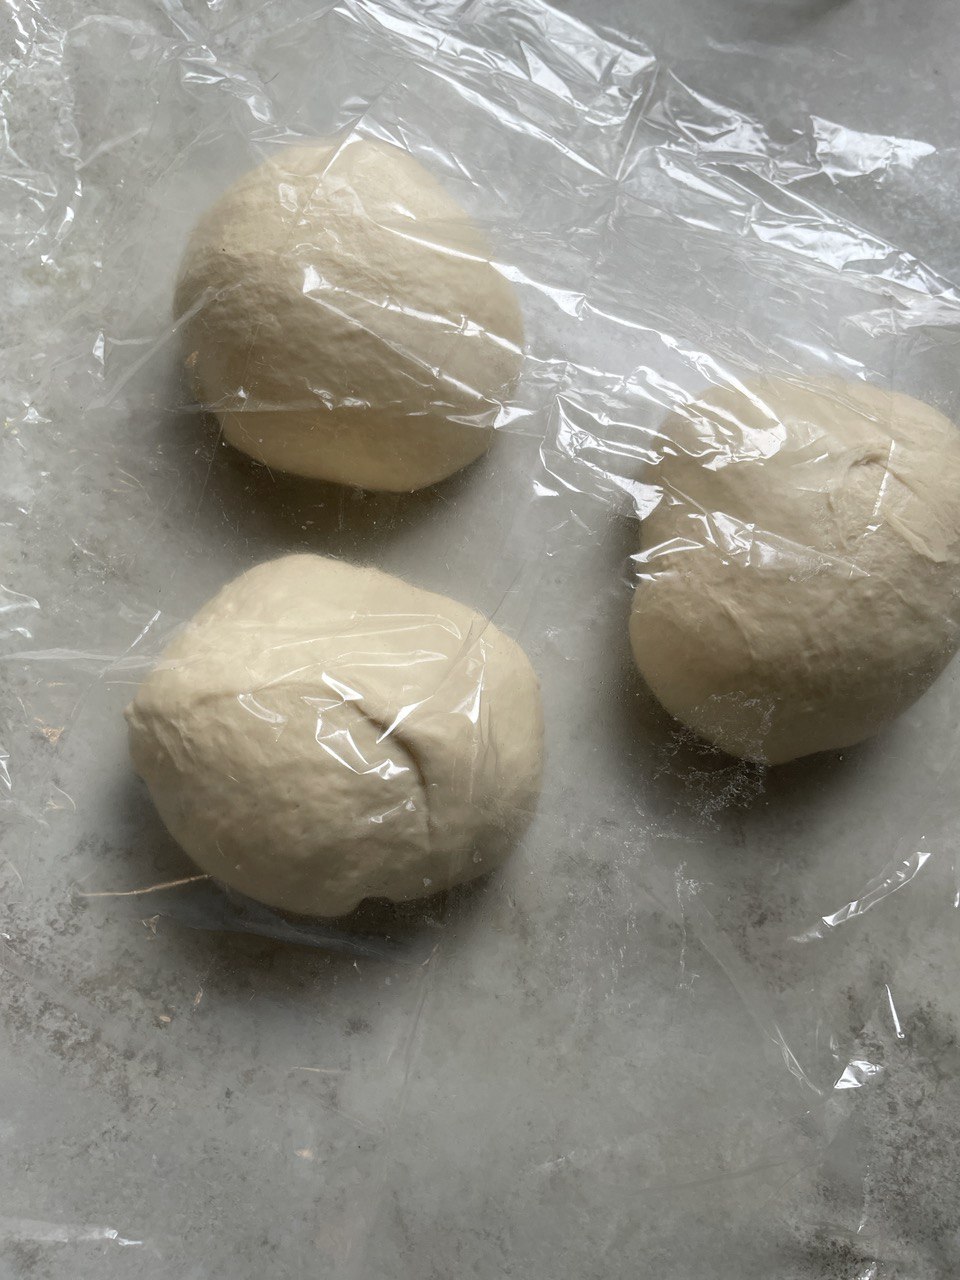
8. When the dough has at least doubled in size, take it out of the bowl, onto a greased work surface (I grease it lightly with some olive oil), and divide it into three equal parts using a dough cutter or a sharp knife. Round each piece into a ball by folding all sides down and connecting underneath (repeat several times to achieve a round ball). Cover it with a towel or plastic wrap, and leave for another 10 minutes. When in a hurry, this step can be skipped, but we've found that the loaves rise better when we spend the extra 10 minutes on this step. So, for best results, be patient and don't take shortcuts!
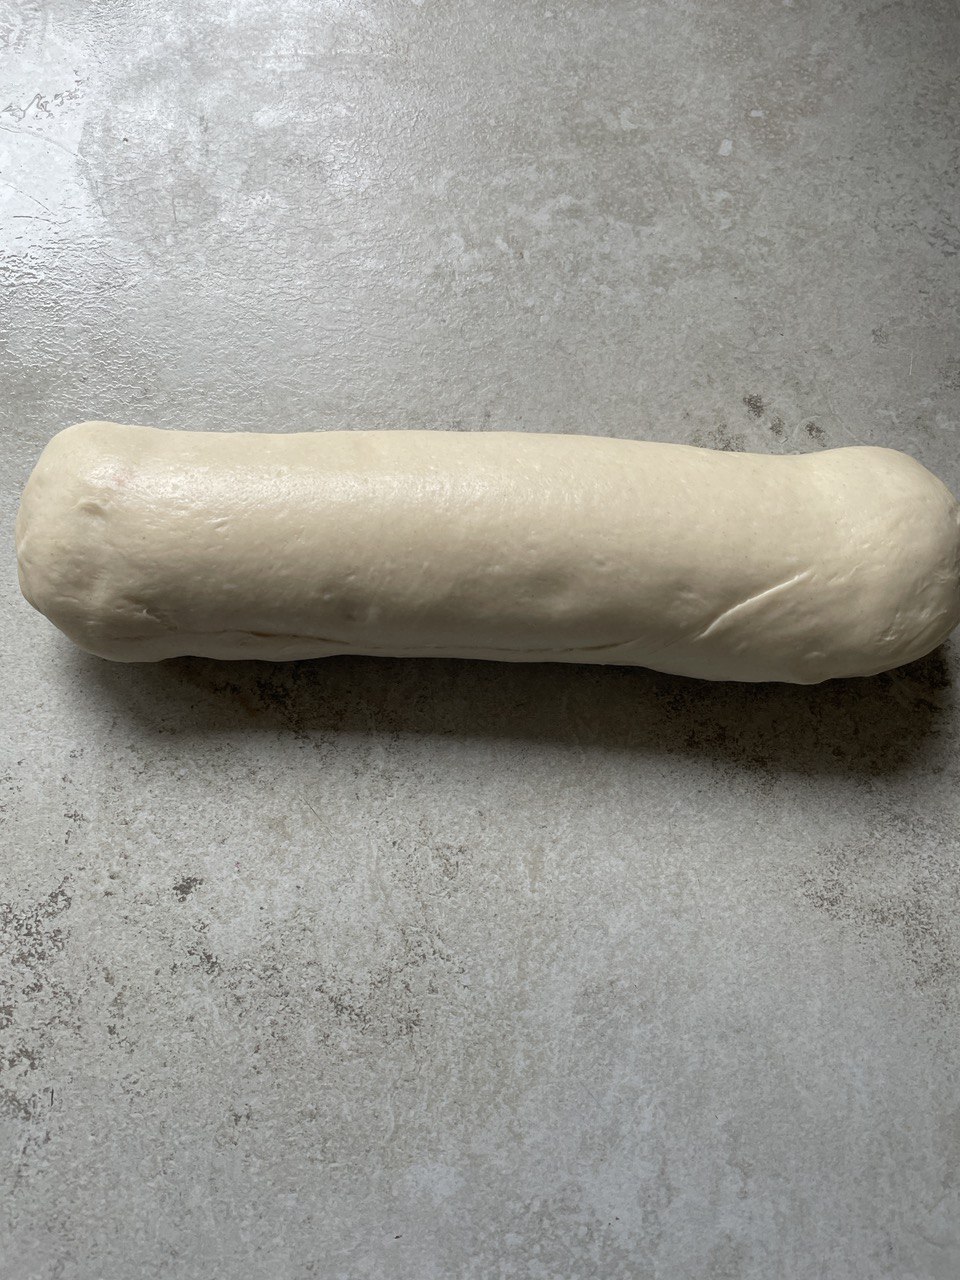
9. Now, take the first ball of dough and roll it into a flat, rather long rectangular. Turn it upside down and repeat the rolling process. If the dough has been proofed well, you'll see bubbles that need to be rolled out.

10. Start shaping the bread. Start by rolling it from the bottom up. After rolling about 2-3 inches up, stop and press with your fingertips along the edge of the roll so that the roll sticks to the layer of dough underneath it. It will prevent air gaps from appearing during the baking process. Continue rolling up and repeating the pressing procedure once in a couple of inches. Once you reach the top edge of the dough sheet, close the edge and the sides of the roll by pinching with your fingertips. Repeat the process with the remaining two balls of dough.

2nd Rise:
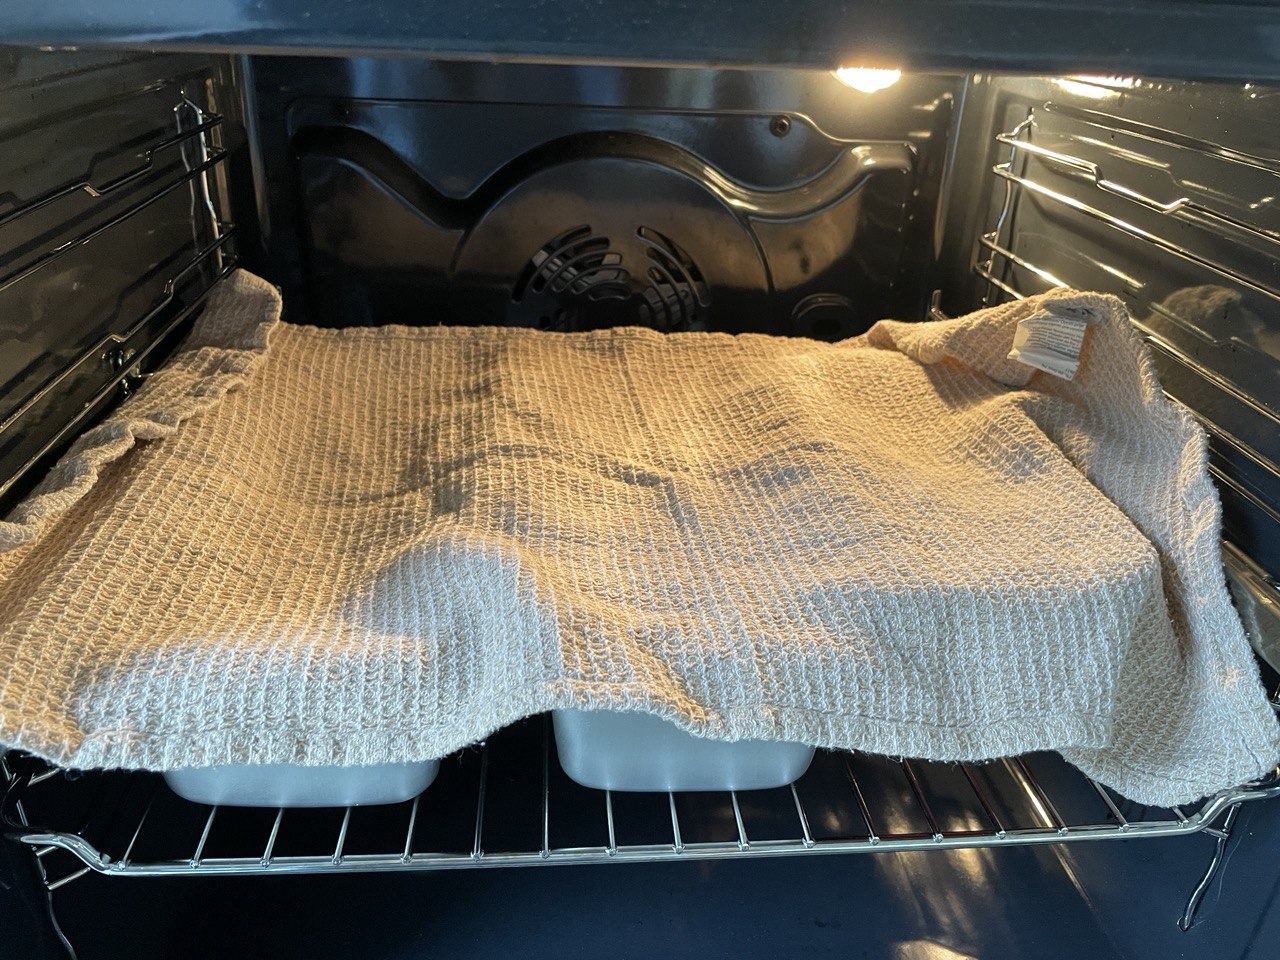
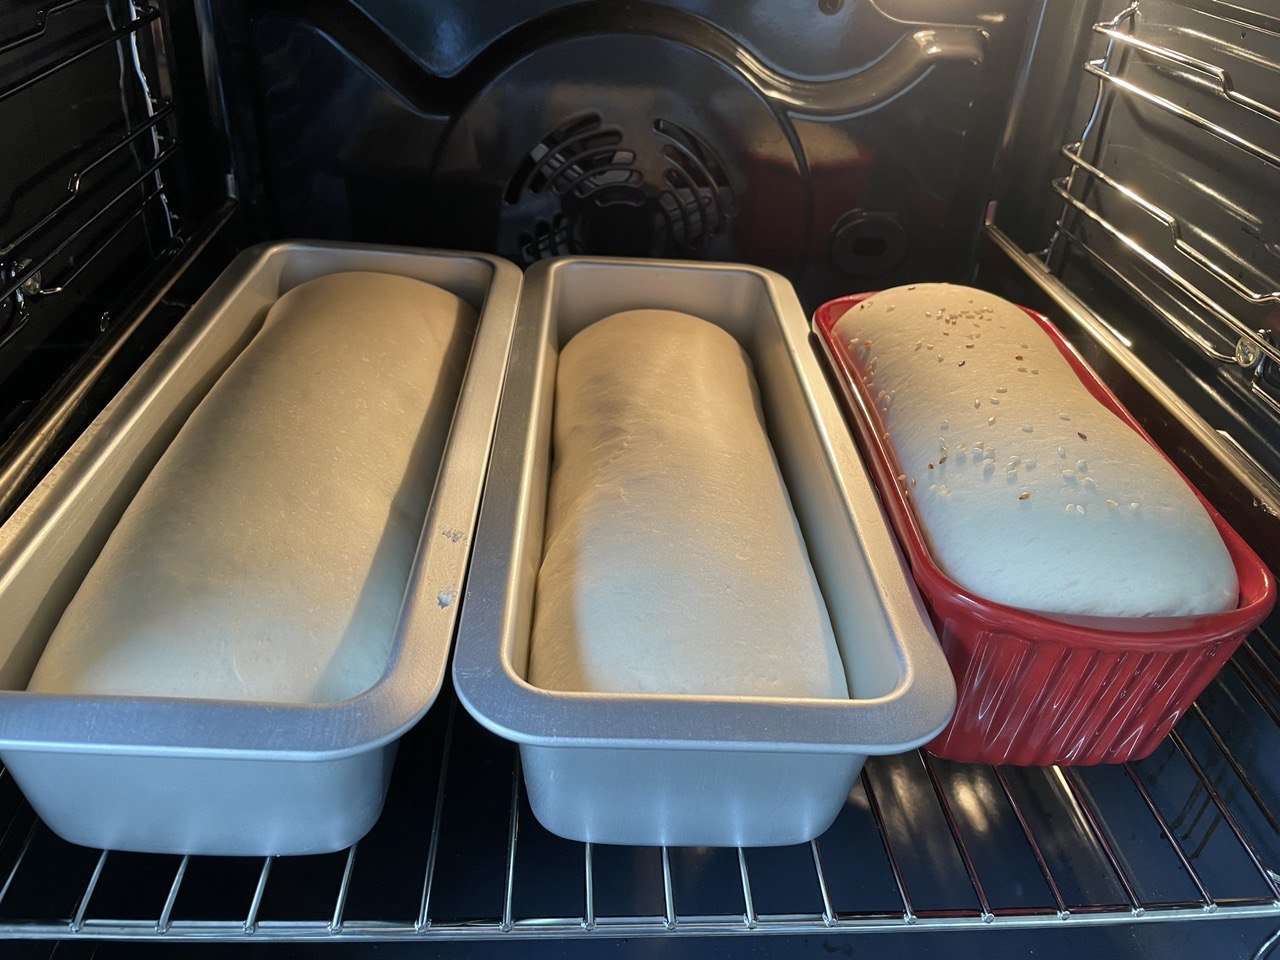
11. Transfer each bread roll to a greased loaf pan, sprinkle some sesame seeds on top, and press lightly with your fingers. Cover the loaves with a towel, and leave for a second rise in a warm spot. It should take an hour or slightly longer. (Note: the rising time can increase to 2 hours when using honey-based dough.)
Baking:
12. Once the time has passed and the loaves have risen, switch on the oven (you don't need to remove the bread from the oven), set the temperature to 392°F (200°C), and bake the bread for about half an hour or until it's golden brown and sounds hollow when tapped.
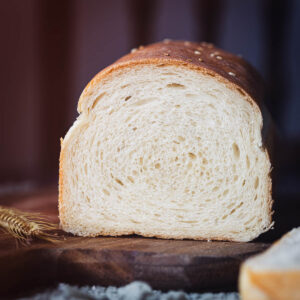
13. Remove the bread from the oven and roll it onto a cooling rack (if the bread is well-done, it will fall out of the mold easily, and the bottom of the bread will be dry and crispy; it can even be light gold in color). Cover with a clean towel and let it cool down. (Meanwhile, you can prepare bread spread with smoked salmon, which is our favorite way to enjoy this freshly baked bread.)

Congratulations! You have just made your very own sandwich bread.
Enjoy the fabulous aroma and try hard not to eat it all before it's even cooled down 🙂
Variations & Notes
- When making burgers with this dough, aim for around 70-80g per mini bun and 400-450g per XL bun. While you can bake the buns on a sheet pan without molds, we prefer using molds to give the buns a similar shape and size. It also gives more control over the rising of the dough.
- Adjust the amount of salt and sweetener to your liking.
- You can partially replace regular wheat flour with whole-grain wheat flour or add a bit of another type of flour, like oat flour. Let your taste buds guide you!
- Pressing the dough with your fingertips when rolling bread is very important. If you skip this step, air bubbles can form inside the bread, and the slices will have gaps.
- EACH step in the recipe is there for a reason. We've made it as short as possible, leaving only the essential steps, leading you to that crunchy and soft bread that leaves you wanting more. Don't skip the 10-minute additional rising on the countertop, either. It will help the wheat bread rise properly and maintain its shape. If you want a perfect sandwich bread, follow the rules :).
Frequently Asked Questions
You definitely can. In that case, you will need ~3x more yeast than the instant active yeast or ~1.5x more than the regular active dry yeast. If the yeast is fresh, the bread rises well with any of these types of yeast. You can use an online calculator for accurate measurements.
Usually, we run out of bread in a day or two 🙂 It's that irresistible! But it definitely tastes good the next day and can be consumed over the next few days when stored in a bread box or any other closed container or bag. We would suggest, though, leaving one (or two) loaves for consumption and freezing the remaining one or two. That way, you'll always have fresh bread when you need it!
It only needs to be done with active yeast, which needs activation. It also helps you ascertain that the yeast is fresh enough. If the yeast increases in size and lifts onto the water's surface, it is fresh enough and can be used. If it doesn't lift and remains on the bottom, you might need to replace it with a fresh one.
Technically, you can. However, the recipe will need some adjustments. Since the dough requires two rises, you'll need to remove it from the bread machine after the first rise, shape the loaf of bread, and then return to the bread maker for the 2nd rise with the hooks removed. Also, you'll need to reduce the ingredients at least by half since you'll only make one loaf at a time. Make sure to follow the recommended settings and timing depending on your bread maker.
We use three regular loaf pans (namely, Ikea HEMMABAK) with the following measurements:
Length: 13 ¾ "
Width: 5 ½ "
Height: 2 ¼ "
Volume: 1.9 qt
You can use similar or slightly smaller ones, but don't go much larger, or the loaves will be rather long and flat, which is not the best thing for sandwich bread.
Easy Recipe For Sandwich Bread (With Sugar-Free Option)
Equipment
- 1 stand mixer
Ingredients
- 1 tablespoon (10 g) salt (we use fine sea or kosher salt)
- 5 teaspoon (20 g) sweetener (sugar OR a sugar-free sweetener like monk fruit sweetener when using instant yeast)
- 2 teaspoon (8 g) instant yeast (or active dry yeast)
- 1 tablespoon olive oil
- 6.6 cups (830 g) wheat flour
- 1 tablespoon butter
- 17.5 fl oz (500 mL) water
Instructions
Making the dough:
- If using non-instant dry yeast: dissolve it in a bowl with warm water and set aside for 5-10 minutes. If the yeast is of high quality, it will "inflate" slightly and become bubbly during this time.If using instant yeast, this step can be skipped.
- Add salt, sweetener, and olive oil to the bowl of a stand mixer. With instant yeast, simply add yeast and warm water to the same bowl.
- Measure the required amount of flour and have a sieve at hand.
- If using non-instant yeast, add it to the mixing bowl now. Stir well using a spoon to combine all the ingredients.
- Sieve flour into the mixing bowl and install the dough hook attachment.
- Start mixing at a minimum speed for 5 minutes, then increase the speed by 1 step and mix for another 5 minutes. After the first 5 minutes, the dough should already be mixed well enough to jump off the sides of the bowl. If it sticks to the walls, add slightly more flour.
First Rise:
- Transfer the dough to a large greased bowl (alternatively, lift the dough ball, grease the bowl of your stand mixer, and return the dough to the same bowl); cover it with a lid or a towel. Transfer it to a slightly preheated oven or another warm place for the first rise. I usually preheat the oven to about 85°F (30°C). At this temperature, the dough takes about an hour to rise.
- When the dough has at least doubled in size, take it out of the bowl, onto a greased work surface (grease it lightly with some olive oil), and divide it into three equal parts using a dough cutter or a sharp knife. Round each piece into a ball by folding all sides down and connecting underneath (repeat several times to achieve a round ball). Cover them with a towel or plastic wrap, and leave for another 10 minutes.
Shaping the Bread:
- Take the first ball of dough and roll it into a flat, rather long rectangular. Turn it upside down and repeat the rolling process. If the dough has been proofed well, you'll see bubbles that need to be rolled out.
- Start shaping the bread. Start by rolling it from the bottom up. After rolling about 2-3 inches up, stop and press with your fingertips along the edge of the roll so that the roll sticks to the layer of dough underneath it. It will prevent air gaps from appearing during the baking process. Continue rolling up and repeating the pressing procedure once in a couple of inches. Once you reach the top edge of the dough sheet, close the edge and the sides of the roll by pinching with your fingertips. Repeat the process with the remaining two balls of dough.
Second Rise:
- Transfer each bread roll to a greased loaf pan, sprinkle some sesame seeds on top, and press lightly with your fingers. Cover the loaves with a towel, and leave for a second rise in a warm spot. It should take an hour or slightly longer. (Note: the rising time can increase to 2 hours when using honey-based dough.)
Baking:
- Once the time has passed and the loaves have risen, switch on the oven (don't remove the bread from the oven), set the temperature to 392°F (200°C), and bake the bread for about half an hour or until it's golden brown and sounds hollow when tapped.
- Remove the bread from the oven and roll it onto a cooling rack (if the bread is well-done, it will fall out of the mold easily, and the bottom of the bread will be dry and crispy; it can even be light gold in color). Cover with a clean towel and let it cool down.
Video
Notes
- When making burgers, aim at around 70-80g of dough per mini bun and 400-450g per XL bun.
- You can partially replace regular wheat flour with whole-grain wheat flour or add a bit of another type of flour, like oat flour. Let your taste buds guide you!
- Pressing the dough with your fingertips when rolling bread is very important. If you skip this step, air bubbles can form inside the bread, and you will have gaps in the slices of bread.
- Don't skip the 10-min additional rising on the countertop either. It will help the wheat bread rise properly and maintain its shape.
Nutritional Value
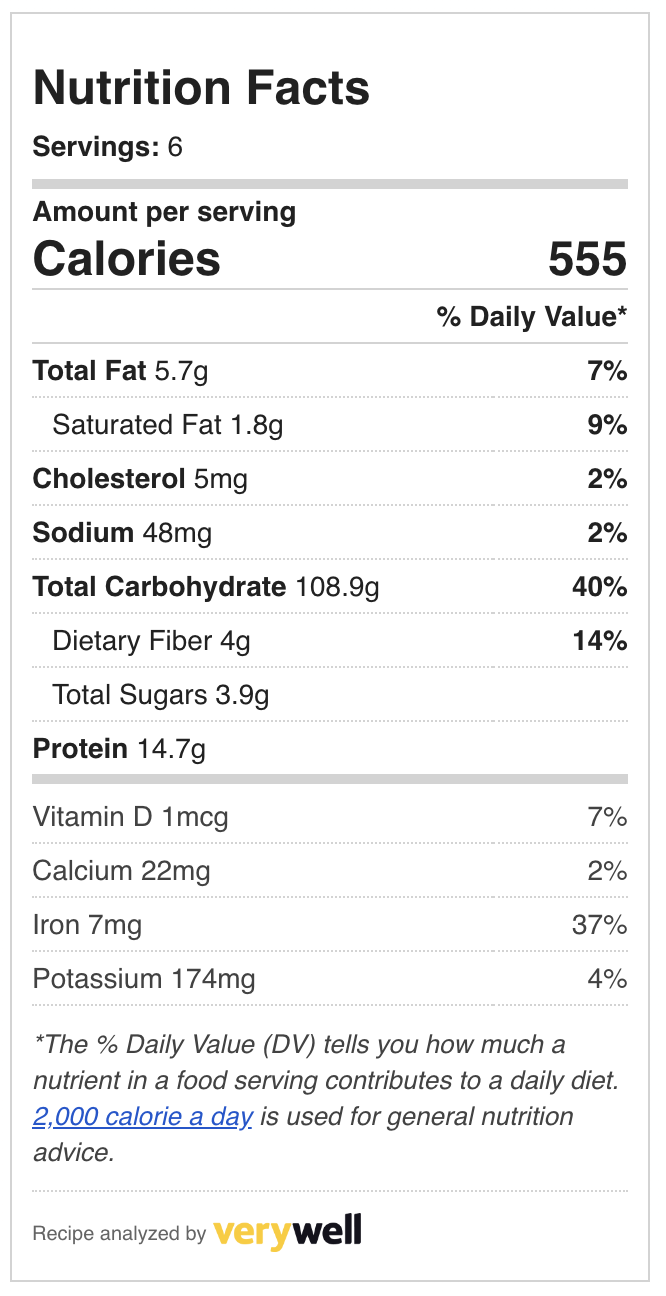
Disclaimer: This nutritional value label has been created using an online analyzer and might not be 100% accurate


Margarita
I like this blog it's a master piece! Glad I detected this
Foodywise Editorial Team
Oh, thank you so much for such a kind feedback! I hope you find lots of inspiration! 🙂
Laura
Hi there. How much water do I put in the recipe? I am not seeing an amount. And I am confused about the sugar? I want a recipe that has a pinch of sugar for the yeast but no more. Is that possible with this recipe? I am confused about what you wrote in your variations describing cutting out/decreasing sugar. Thanks!
Foodywise Editorial Team
Hi Laura! Thanks for stopping by! We're actually about to update the recipe because we've experimented with reducing the amount of sugar to 0 and it worked like a charm! So, while the post is being updated, you can replace all the sugar with an erythritol- or monk fruit-based sweetener BUT it's important to use instant yeast. We used the one from Puratos.
As for the water, you'll need 500 mL (17.5 fl oz). I've updated the recipe card, thank you for pointing this out!
Let me know if there are any other questions along the way 🙂