
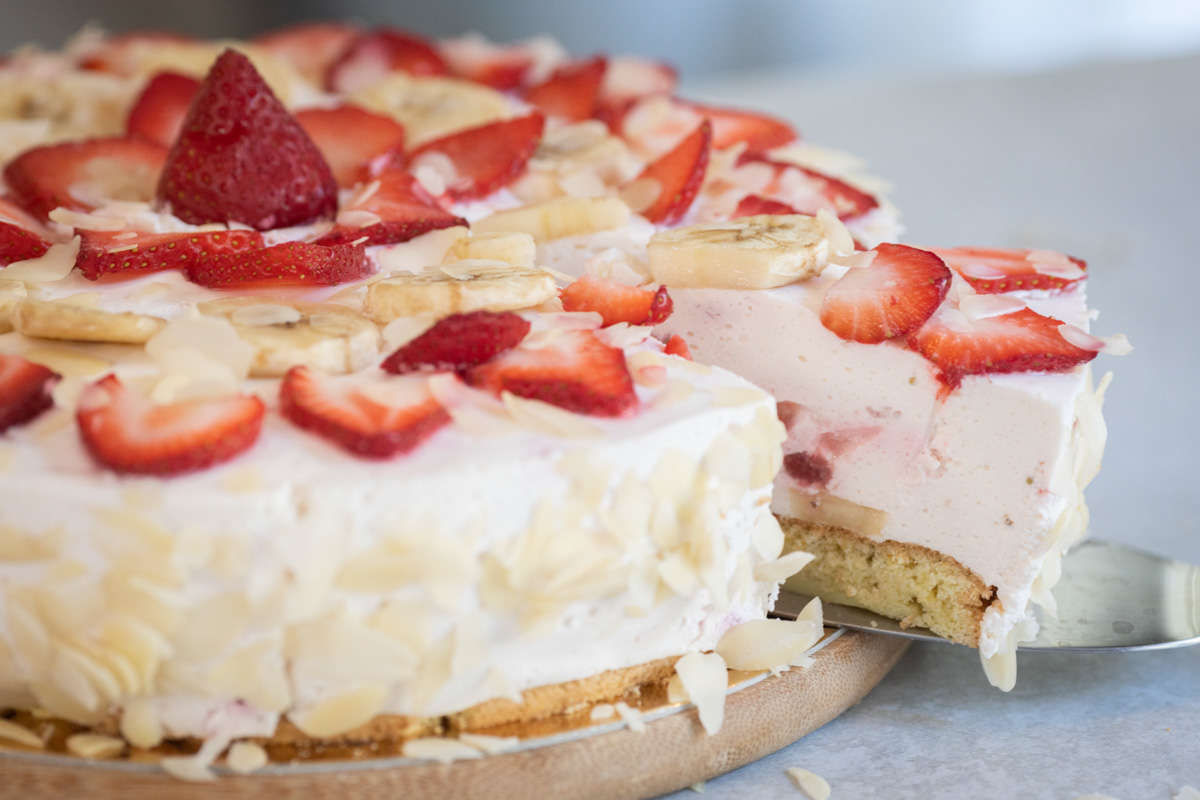
Strawberry season brings one of life's greatest pleasures - the perfect excuse to make this incredible gluten-free strawberry cheesecake that's both keto-friendly and completely sugar-free! This delicious sugar-free strawberry cheesecake offers an amazingly light and creamy texture that contains no sugar, no gluten, and is absolutely loaded with fresh, juicy strawberries.
Recipe Highlights
- Perfect for strawberry season: Takes full advantage of fresh, peak-season berries
- Triple diet-friendly: Gluten-free, sugar-free, and keto-compatible
- Incredibly light and airy: The buttery almond flour crust paired with fluffy filling is a little bit of heaven
- No baking the filling: The gelatin-set filling means no risk of cracks or overbaking
- Make-ahead perfect: Ideal for special occasions like Mother's Day, Father's Day, or a birthday
- Simple ingredients: Everything you need is likely available at your local grocery store
- Antioxidants: Fresh strawberries are loaded with vitamin C and antioxidants
- No artificial additives: Made with real, whole food ingredients
This isn't just another low-carb cheesecake recipe - it's a testament to how amazing sugar-free desserts can be when done right. Unlike traditional New York-style cheesecake that relies heavily on sugar and graham crackers, this version proves that you don't need to compromise on taste or texture when following a healthier lifestyle.
If you're new to keto baking, you might also love our Ultimate Keto Lemon Cheesecake Recipe, which uses similar techniques for equally stunning results.
Ingredients
Let's break down why each ingredient plays a crucial role in creating this perfect low-carb dessert:
Eggs: The foundation of our gluten-free almond flour crust. We separate these to create the lightest, most airy base possible. The yolks provide richness and binding power, while the whites are whipped to stiff peaks, creating that signature fluffy texture that makes this crust so special.
Allulose: This powerhouse sweetener behaves almost identically to sugar but without the carbs. It whips beautifully with egg yolks and dissolves seamlessly into the cream cheese mixture. Unlike some artificial sweeteners, allulose doesn't leave any bitter aftertaste or cooling sensation and doesn't crystallize.
Almond Flour: creates our buttery almond flour crust without any gluten. This small amount provides just enough structure while keeping the crust light and tender. Make sure to use finely ground almond flour for the best results.
Orange Zest: This might seem like an odd addition, but it adds a subtle citrus note that enhances the strawberry flavors without competing with them. Fresh orange zest brings aromatic oils that make the whole dessert more complex and interesting.
Fresh Strawberries: The star of the show! We use strawberries both in the creamy filling and as decoration. Peak strawberry season berries will give you the best flavor - look for berries that are deep red, fragrant, and slightly soft to the touch.
Cream Cheese: The backbone of our creamy texture. Make sure your cream cheese is at room temperature before mixing - this ensures smooth blending and prevents lumps in your cream cheese mixture. Cold cream cheese will create a grainy texture that's hard to fix.
Heavy Cream: Adds richness and helps create that perfect creamy cheesecake base texture. The cream whips beautifully with the cream cheese and helps lighten the overall filling.
Banana: Acts as a natural sweetener and adds creaminess to the filling. The banana also provides a lovely flavor complement to the strawberries.
Gelatin Sheets: Essential for setting the filling without baking. Sheet gelatin dissolves more smoothly than powder, but you can substitute powdered gelatin if that's what you have available. The key is following the package instructions carefully and incorporating them properly to avoid lumps.
For more guidance on working with alternative sweeteners, check out our Sugar-Free Baking Conversion Guide, which covers everything you need to know about different sweeteners in keto baking.
Step-by-Step Instructions
Creating the Perfect Gluten-Free Crust
- Prepare your workspace: Line your cake mold (or springform pan) with parchment paper and lightly grease with butter or cooking spray. Preheat your oven to 365°F (185°C).
- Separate the eggs: Carefully separate egg whites from yolks, ensuring no yolk gets into the whites (even a small amount will prevent proper whipping).
- Whip the yolks: In a large bowl, add ⅔ of the measured allulose to the yolks. Using a hand mixer on medium speed, whisk until the mixture becomes uniform and light yellow.
- Add aromatics: Gently whisk in the orange zest, then fold in the almond flour until just combined. Don't overmix at this stage.
- Whip the whites: In a separate mixing bowl (make sure it's completely clean), add egg whites with a pinch of salt. Whisk until soft peaks form, then gradually add the remaining ⅓ of allulose. Continue whisking on high speed until very firm peaks form - they should hold their shape when you lift the beaters.
- Fold together: Gently fold the whipped egg whites into the yolk mixture using a large spoon or spatula. Work carefully to maintain as much air as possible - this is what gives your crust its light, airy texture.
- Bake to perfection: Pour the batter into your prepared mold and bake for 15-25 minutes until golden brown. The exact time depends on your oven, so watch carefully.
- Cool and prepare: Remove from the oven, let cool completely, then remove from the mold and place inside a cake ring about ½ inch larger in diameter than your crust.
- Add banana layer: Arrange banana slices evenly over the crust - this creates a moisture barrier and adds extra flavor.
Preparing the Filling
- Start with cream cheese: In a large bowl, combine the room temperature cream cheese with allulose. Using a hand mixer on medium speed, beat until completely smooth and creamy - no lumps should remain.
- Add cream: Gradually pour in the heavy cream while mixing. Continue beating until the mixture is creamy and firm.
- Prepare gelatin: Follow the package instructions for your gelatin sheets. Usually, this involves soaking in cold water, then dissolving in a small amount of hot water.
- Incorporate gelatin carefully: This is the crucial step for smooth results! Take 2 tablespoons of your prepared cream mixture and gradually stir it into the melted gelatin until completely combined. Then add this gelatin mixture back to the rest of the cream, mixing thoroughly to prevent lumps.
- Blend in fruit: Gently fold in the fresh strawberries, being careful not to overmix and break up the berries too much.
- Assemble: Pour the filling over your prepared crust and banana layer. Gently shake the pan to help the mixture settle evenly.
- Initial set: Refrigerate for 5-7 minutes to allow the surface to set slightly before decorating.
- Final decoration: Arrange the remaining sliced strawberries and bananas on top, then return to the refrigerator to set completely, preferably overnight. When using sliced banana for decoration, sprinkle the slices with lemon juice to keep them from browning.
Pro Tips for Best Results
- Room temperature matters: Cream cheese should be at room temperature for the smoothest mixing
- Don't rush the gelatin: Take time to properly dissolve and incorporate the gelatin to avoid lumps
- Gentle folding: When combining ingredients, use a folding motion rather than stirring to maintain the light texture
- Sharp knife for serving: Use a sharp knife dipped in warm water for clean slices
- Sprinkle bananas with lemon juice: This will slow the oxidation process and prevent the banana slices used for decoration from browning.
For best results, consider using a stand mixer (like our Kenwood Titanium Chef Baker XL Stand Mixer Review), which can make whipping and mixing much easier.
Variations and Substitutions
This recipe is quite flexible! Here are some ways to customize it:
Different berries: Replace strawberries with fresh berries like raspberries or blueberries. Mixed berry combinations work beautifully, too.
Citrus twist: Add a bit of lemon juice or lemon zest to brighten the flavors, though be cautious as too much acidity can interfere with gelatin setting.
Chocolate version: Add a tablespoon of cocoa powder to the crust for a chocolate base, or drizzle sugar-free chocolate sauce over the finished dessert.
Serving Suggestions
This creamy keto strawberry cheesecake is perfect for so many occasions:
- Hot summer days: The no-bake filling makes this ideal when you don't want to heat up the kitchen
- Special occasions: Beautiful enough for Mother's Day or birthday celebrations
- Sugar-free dinner parties: Impressive presentation that guests will never guess is sugar-free
- Meal prep: Make ahead for the week's dessert portion control
Frequently Asked Questions
While you can use a food processor for the cream cheese mixture, you might find that hand mixing provides a more gentle and controlled whipping. However, feel free to use the equipment you feel most comfortable with.
Gelatin is essential for the no-bake setting. Without it, you'd need to completely reformulate the recipe as a baked cheesecake, which would change the light, airy texture significantly.
You can substitute with other powdered sweeteners like erythritol or monk fruit, but the texture may be slightly different. Check our sugar-free baking guide for conversion ratios.
We do not recommend freezing gelatin-based cakes, as gelatin tends to lose its thickening properties upon thawing.
This usually happens when the gelatin is added directly to the cold cream mixture. Always temper it first by mixing a small amount of the cream into the gelatin before combining with the rest.
Fresh strawberries work best for both flavor and texture, especially during strawberry season. If you must use frozen, thaw completely and drain excess liquid first.
This dessert actually improves overnight as the flavors meld together. You can make it up to 2 days ahead for the best results.
Cover tightly and refrigerate in an airtight container. The gelatin filling holds up well for several days, making this perfect for meal prep desserts.

Gluten-Free Strawberry Cheesecake With Buttery Crust
Ingredients
Crust
- 4 eggs
- 4 tablespoon allulose
- 4 tablespoon almond flour
- a pinch of orange zest
Filling
- 7 oz (200 g) fresh strawberries (can be slightly adjusted to your liking)
- 14 oz (400 g) cream cheese
- 10.5 oz (300 mL) heavy cream
- 6 tablespoon allulose
- 1 banana
- 7 sheets of gelatin
Decoration
- 1 banana, sliced
- 7 oz (200 g) fresh strawberries, sliced
Instructions
Prepare the crust
- Separate egg whites from yolks.Add ⅔ of the measured amount of allulose to the yolks and whisk until the mixture becomes uniform and light yellow.
- Add orange zest to the yolk mixture, and whisk it in lightly.
- Add almond flour to the yolk mixture, and whisk lightly once again.
- Add egg whites with a pinch of salt in a separate bowl and whisk until the mixture becomes firm (you'll want to catch the moment when the mixture is just becoming firm, don't aim at the super-firm foams just yet!). Then add the remaining ⅓ of allulose and continue whisking until very firm foams.
- Fold the whipped egg whites into the yolk and flour mixture.
- Line your cake mold with parchment paper and smear butter across the bottom and sides of the mold. Preheat the oven to 185°C (365°F).
- Bake the crust for 15-25 minutes (depending on your oven; the crust will become golden brown when ready).
- When ready, remove the crust from the mold, let it cool down, and then place it inside a cake ring that's slightly (approx. 1 cm) larger than the diameter of the crust.
- Layer banana slices on top of the crust. Set aside while you prepare the filling cream.
Prepare the filling cream
- Add cream cheese to a medium-sized bowl. Add allulose. Mix until uniform and creamy.
- Add heavy cream and whisk until firm and creamy mixture.
- Prepare the gelatin sheets as per instructions on the package (make sure to consider the amount of gelatin).
- To prevent lumps, take 2 tbsps of the prepared cream and add them one by one to the melted gelatin while stirring until thoroughly combined. Then add this mixture to the rest of the prepared cream and mix well.
- Pour the mixture into the cake ring on the crust and banana slices. Shake slightly for the mixture to adapt to the shape of the mold and to even out on the top.
- Refrigerate the cake for 5-7 minutes to allow the cake to set slightly.
- Then decorate with fresh strawberries and bananas and return to the fridge to set completely. It's best to leave it overnight.
Video
Notes
- Cream cheese should be at room temperature for the smoothest mixing
- Take time to properly dissolve gelatin and incorporate it to avoid lumps
- When combining ingredients, use a folding motion rather than stirring to maintain the light texture
- Use a sharp knife dipped in warm water for clean slices
- Sprinkle bananas with lemon juice: This will slow the oxidation process and prevent the banana slices used for decoration from browning.
This gluten-free strawberry cheesecake with its buttery almond flour crust represents everything we love about healthier baking - it doesn't feel like a compromise. The combination of the light, airy crust with the creamy, strawberry-studded filling creates a dessert that's genuinely special.
Whether you're making this for the first time or you're a seasoned pro at keto desserts, this recipe delivers consistent, impressive results. The key is taking your time with each step, especially the gelatin incorporation and the gentle folding of ingredients.
During peak strawberry season, when berries are at their sweetest and most affordable, this recipe becomes an absolute must-make. It's the kind of dessert that makes people stop mid-conversation and ask for the recipe - and you can proudly share that it's completely sugar-free and gluten-free.

Share your comments, rate, or ask a question!